FEATURE TOUR
Just getting started? The Feature Tour takes you through the highlights.
If you need more information, check out the User Manual for CoolPDF.
Using CoolPDF is simple. Just select the CoolPDF printer in the Print dialog box of any application and
then Print, CoolPDF will create a PDF for you.
|
 CoolPDF
$99 CoolPDF
$99
(Click here for
quantity pricing)


|
Step 1: Select the CoolPDF printer from the drop list of
available printer in the Print dialog box of your application and click
Print.
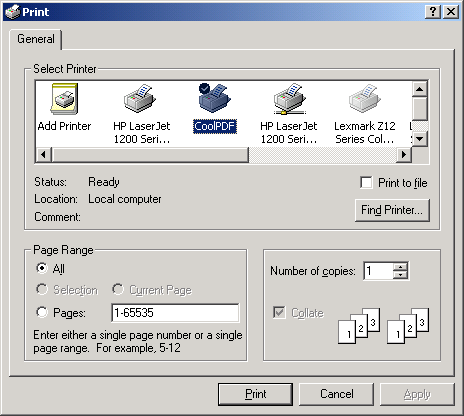
Step 2: Wait for the "Save As" dialog to appear as shown below.
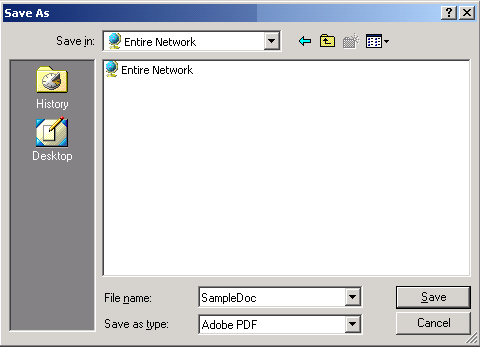
Step 3: Specify the destination folder and file name for the
generated PDF document.
|
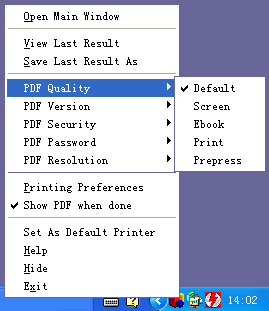
For different purposes, the quality of the produced PDF files differs. The following levels of quality are predefined,
Default Quality:
selects output intended to be useful across a wide variety of uses, possibly at the expense of a larger output file
Screen Quality:
selects low-resolution output similar to the Acrobat Distiller "Screen Optimized" setting.
eBook Quality:
selects medium-resolution output similar to the Acrobat Distiller "eBook" setting.
Print Quality:
selects output similar to the Acrobat Distiller "Print Optimized" setting.
Prepress Quality:
selects output similar to Acrobat Distiller "Prepress Optimized" setting.
|
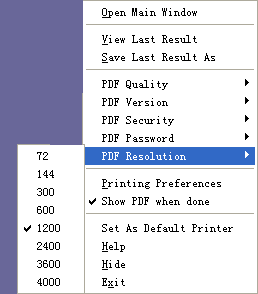
The resolution of a PDF document can be specified here, you may choose any of the following resolution to meet your needs,
72 dpi
144 dpi
300 dpi
600 dpi
1200 dpi
2400 dpi
3600 dpi
4000 dpi
NOTE: The higher the dpi value, the bigger file size you will get.
|
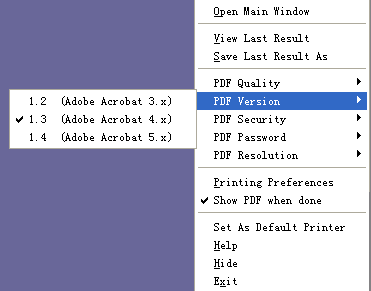
The PDF version decides the compatibility level of a PDF file. For example, PDF document of version 1.2 can be opened by Adobe Acrobat Reader 3.x or higher version and edited by Adobe Acrobat 3.x or later. PDF document of version 1.4 can be opened by Adobe Acrobat Reader 5.x or higher version and edited by Adobe Acrobat 5.x or later.
The reason why CoolPDF does not provide the option to create PDF documents of version 1.5 (Adobe Acrobat 6.x), 1.6 (Adobe Acroabt 7.x),
1.7 (Adobe Acrobat 8.x, 9.x, 10.x, ISO standards) is that there are a good number of computers both PC and Mac running Adobe Acrobat 5.x or lower version. Therefore, creating PDF documents of version 1.5 and 1.7 is not of much use as far as now is concerned.
|
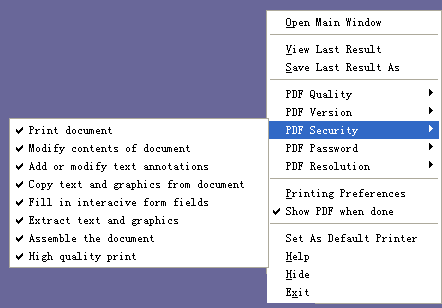
A PDF document can be secured by setting access permissions. CoolPDF uses 128-bit (RC4) encryption to secure PDF documents, and protect PDF files by disabling,
 Print document (possibly not at the highest quality level). Print document (possibly not at the highest quality level).
 Modify contents of document, except as controlled by 32, 256 and 1024. Modify contents of document, except as controlled by 32, 256 and 1024.
 Copy text and graphics from document other than that controlled by 512 Copy text and graphics from document other than that controlled by 512
 Add or modify text annotations, fill in,
create or modify interactive form fields Add or modify text annotations, fill in,
create or modify interactive form fields
 Fill in existing interacive form fields Fill in existing interacive form fields
 Extract text and graphics (in support of accessibility to disabled users or for other purposes). Extract text and graphics (in support of accessibility to disabled users or for other purposes).
 Assemble the document (insert, rotate, or delete pages and create bookmarks or thumbnail images) Assemble the document (insert, rotate, or delete pages and create bookmarks or thumbnail images)
 High-quality printing High-quality printing
Note: To enable this feature, you should set a Owner Password for your PDF document.
|
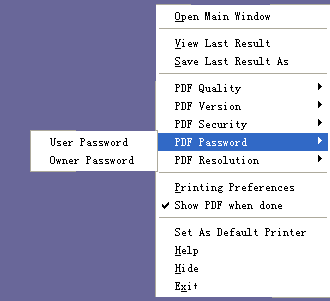
You can set User Password for anyone who opens your PDF document.
You can set Owner Password for yourself to protect your PDF document from being modified, copied, assembled etc. The Owner Password is strictly required if you set the PDF access permissions. Without the Owner Password, any setting in the PDF access permissions section will be inactivate and useless.
To clear either User Password or Owner Password, you can leave the blank empty in the Password Input Dialog, and you will receive a message indicating "Password Cleared" after you click the "OK" button to confirm.
|
When you try to print a web site or web pages from Microsoft Internet Explorer to the "CoolPDF" printer, and you will not get the "Save As" dialog window. Why? Printing web to PDF requires special technique to fulfil the task. Here are the steps for printing web to PDF file.
To print a web site or web pages to PDF file:
1. Start Internet Explorer, open the web site or web page that you wish to print to PDF
2. Print the document as you normally do but select the printer named "CoolPDF"
3. Confirm the print job
4. Double-click the icon of CoolPDF on the bottom right corner of your system tray
5. Click "the Menu" button and choose "View Last Result" to view the produced PDF file, and you may also choose "Save Last Result As" to save your web page to
PDF.
|
Sharing the "CoolPDF" printer is very easy. You may treat it as a real printer in your "Printers and Faxes" folder. You may follow the steps illustrated below.
1. Choose the "CoolPDF" printer, right-click your mouse, choose "Sharing ... " in the menu.
2. You might be warned of a security issue. Just allow this printer for remote access.
3. Choose the "Share this printer" option, and specify a share name for this printer. In this example, we use "PDF". Don't click the additional "Additional Drivers... " button until other computers have difficulty accessing this shared printer.
4. Click "Apply", and then "OK ".
5. You will probably receive an error message like "Printer settings could not be saved. Operation not supported ", if Group Policy is not properly set on your computer. Visit
Microsoft web site for the solution.
Sharing the "CoolPDF" printer requires you to purchase additional licenses, if you want to more users to access the printer.
Note: CoolPDF is licensed on a "per user" basis.
|
CoolPDF provides support for large paper size up to 14400 x 14400 points, 200 x 200 inch, 5080 x 5080 millimeters.
AutoCAD users who want to convert DWG to PDF or convert DXF to PDF
can now output drawings in Adobe PDF format with larger paper sizes.
|
Before you install the software, log in Microsoft Windows with an Administrator privilege. After you run the install program, you will see a new printer added in your "Control Panel"->"Printers and Faxes " with the name
"CoolPDF".
The setup program of "CoolPDF" supports very silent installation, you may use the following command to deploy the software,
CoolPDFSetup.exe /SP- /VERYSILENT
Sometimes the setup program requires user to restart Microsoft Windows, therefore, another parameter /NORESTART can be used to prohibit user's computer from rebooting,
CoolPDFSetup.exe /SP- /VERYSILENT /NORESTART
|
|
Acrobat is a registered trademark of Adobe Systems, Inc.
Windows is a registered trademark of Microsoft Corporation.
|
|


